Work in Progress...
- Save the dates- boarding pass style (DONE)
- Seashell boutonnieres (DONE)
- Seashell box invitations w/ DIY envelope liners (DONE)
- Flower fascinator(s) (DONE)
- Birdcage veil (DONE)
- Starfish & sand dollar escort cards (DONE)
- Table number/names (DONE)
- Lion paw shell for the ring bearer (DONE)
- Flowergirl "basket" (DONE)
- Bouquet jewelry (DONE)
- Bridal necklace (DONE)
- Tissue packets (DONE)
- Out of Town bags (DONE)
- Dinner menus (DONE)
- Ceremony programs (DONE)
- Postcards (DONE)
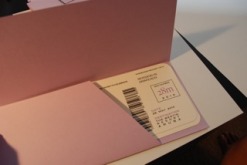
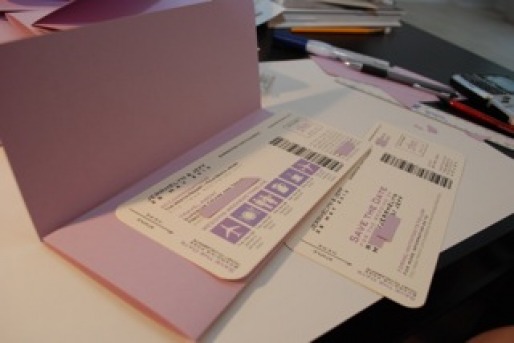
Boarding Pass-Save the Dates:
Yahoo...the FI and I just finished our save the dates! We're having a destination wedding in Aruba and decided it would be fun to have boarding passes. We got the template online @ http://www.ayleebits.com/tag/template and the FI's cousin designed the whole thing using her MAC (thanks Ate Nana)! The template uses 3 tickets per 8x11 sheet of paper, so all we did was use my paper cutter and a rounded edge punch.
We bought ivory linen card stock from Office Max ($0.18 per sheet) and lavender card stock from Ben Franklin (70 sheets for $18). I ordered ivory linen No.10 envelopes from http://www.envelopemall.com ($11.50 for 100). So this project was less than $50!!!
The 1st page of the STD we put our guest names on the right corner to make it more personal (last name/first name). We added a second page to give our guest information about travel and hotel accommodations by adding our travel agent contact info. The time line on the bottom of the 2nd page is to let our guests know the day of events: when we arrive, welcome/rehearsal dinner, wedding day, happy hour, brunch, and coming home (respectively). For the boarding pass jacket we used Word to create the monogram.
This project was a lot of fun, not to mention easy and inexpensive!

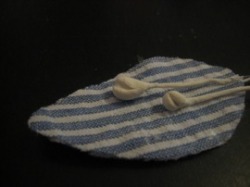
Seashell Boutonniere:
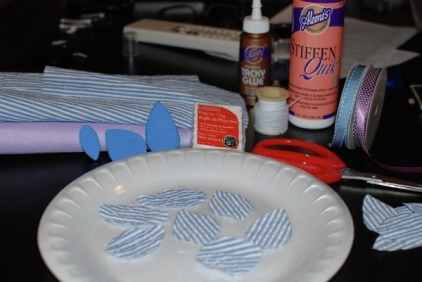
Jeff and I made these boutonnieres for the groomsmen, we're only having 4 so I'm still working on them, but I got too anxious and wanted to share it with ya'll! To keep with the beach theme we made these seashell bouts with shells Jeff and I collected on a previous trip to the Outer Banks (pre-engagement) and sea fan from Aruba (cool huh?)! We thought it would be a nice personal touch and a fun DIY project, not to mention inexpensive!
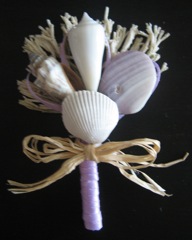
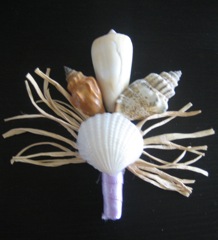
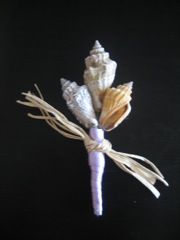
Tools needed for this project:
For the sea fan, we tore off pieces and separated the tiny branches. We then placed it on paper plates and used a foam brush to layer the mod podge. The drying time takes about 10-15 mintues. After wards just hot glue the bottom of the sea fan to the back of the bout. Lastly wrap the raffia around the bout and your done! Easy peasy!
- Shells
- hot glue gun
- floral wire
- ribbon
- raffia
- mod podge (hardening glue)
- foam brush
For the sea fan, we tore off pieces and separated the tiny branches. We then placed it on paper plates and used a foam brush to layer the mod podge. The drying time takes about 10-15 mintues. After wards just hot glue the bottom of the sea fan to the back of the bout. Lastly wrap the raffia around the bout and your done! Easy peasy!
Hair Fascinator(s):
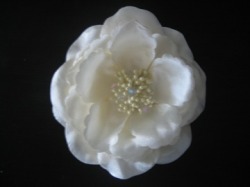
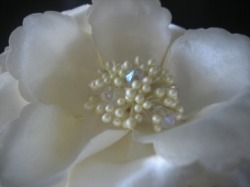
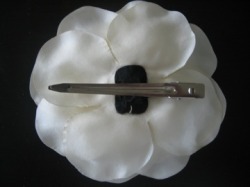
So I was out shopping with the fiancé and I came across a black headband with an ivory flower (Forever 21). I thought it was so cute, even Jeff thought it was cute! I looked at the price tag and it looked even better…$3.75!! I knew I wanted a flower in my hair for the reception, but when I was searching online (mostly Esty) they were a little over budget. So I thought this would be a great DIY project for me to take on.
I just carefully took apart the flower from the headband and sewed several crystal jewels that I already had from jewelry making. Afterwards, I placed a metal duckbill clip (you can get this from any beauty salon store like Sally’s) in place of the headband. I just hot glued some petals to the clip so it doesn’t show.
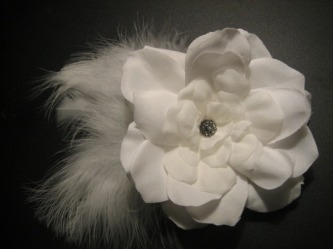
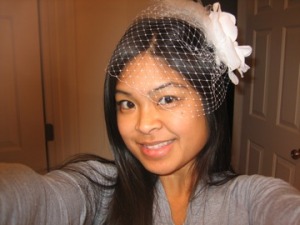
I made another hair fascinator for our church wedding, YES people, Jeff and I are getting married by our church in Richmond (just us and immediate family). Anywho, I decided that the dress for this ceremony will be white and short, so I decided to use a birdcage veil to add a little modern, classy feel to the attire. I found great tutorials online and thanks to these step by step instructions, I created something beautiful (at least I think so)!
hair fascinator: http://www.weddingbee.com/2008/09/18/a-wedding-in-a-week-hair-flower/
I just carefully took apart the flower from the headband and sewed several crystal jewels that I already had from jewelry making. Afterwards, I placed a metal duckbill clip (you can get this from any beauty salon store like Sally’s) in place of the headband. I just hot glued some petals to the clip so it doesn’t show.
I made another hair fascinator for our church wedding, YES people, Jeff and I are getting married by our church in Richmond (just us and immediate family). Anywho, I decided that the dress for this ceremony will be white and short, so I decided to use a birdcage veil to add a little modern, classy feel to the attire. I found great tutorials online and thanks to these step by step instructions, I created something beautiful (at least I think so)!
hair fascinator: http://www.weddingbee.com/2008/09/18/a-wedding-in-a-week-hair-flower/
birdcage veil: http://madebymaryann.blogspot.com/2008/04/birdcage-veils-and-how-to-make-one-part_20.html
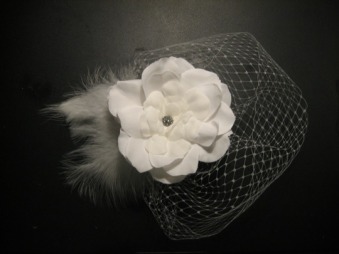
Cost breakdown:
French netting: $4/yd (I used less than half)- Ebay
Silk flower: $1- Micheal's with coupon
Feathers: $1- Michael's with coupon
Clip for birdcage: $2 for pack of 6 (I only used 1)- $1 Michael's with coupon
Button (center of flower)- Free (from extra button stash)
French netting: $4/yd (I used less than half)- Ebay
Silk flower: $1- Micheal's with coupon
Feathers: $1- Michael's with coupon
Clip for birdcage: $2 for pack of 6 (I only used 1)- $1 Michael's with coupon
Button (center of flower)- Free (from extra button stash)
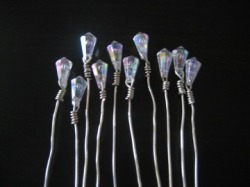
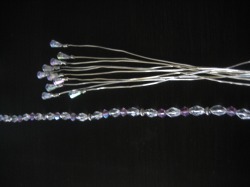
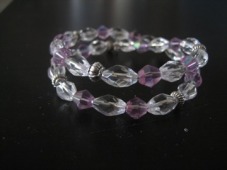
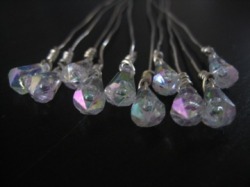
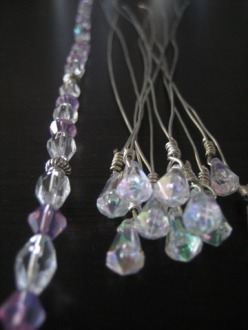
Bouquet Jewelry:
I went to a wedding a couple of years ago and the bride had a bouquet of my favorite flowers, calla lilies. I fell in love with it, hers was pink and white and had jewels scattered in it. I had never seen that done before and now it’s a popular wedding trend. So I knew that I wanted the same for my bouquet, I’m also using calla lilies, but mine will be all mini purple calla lilies instead.
I used to make jewelry for fun, but quickly got over it! So I still have the tools and accessories, so again, another DIY project!! I just used my leftover jewels and jewelry wire. You’ll also need a jewelry wire cutter and pliers. I just made a dozen crystal sticks to scatter in the bouquet and a piece to wrap around the handle of the bouquet. This project took no time at all! Here’s the end result:
I used to make jewelry for fun, but quickly got over it! So I still have the tools and accessories, so again, another DIY project!! I just used my leftover jewels and jewelry wire. You’ll also need a jewelry wire cutter and pliers. I just made a dozen crystal sticks to scatter in the bouquet and a piece to wrap around the handle of the bouquet. This project took no time at all! Here’s the end result:
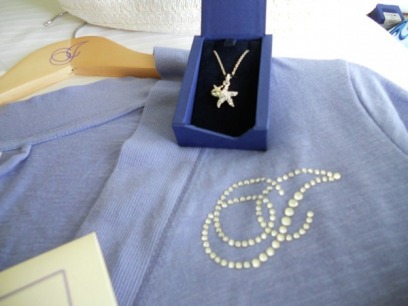
My "Somthing Blue"...
I didn’t know what type of bling I wanted to wear on my wedding day so as I surfed the web, mostly on Etsy, I found things I feel in love with. After much searching, I finally decided that I wanted to wear a dramatic necklace since my dress is very simple. I wanted to incorporate my “something blue” into the necklace as well. The pieces I did fall in love with were out of my price range, so I took it upon myself to make one. For the next couple of days I searched on Ebay for cheaper vintage brooches and necklaces. I ended up winning a bid on a vintage multi-strand pearl necklace for $12 and a vintage blue brooch for $0.99. I was being so cheap that I only bid on items that had free shipping! Here’s the end result:
Before...
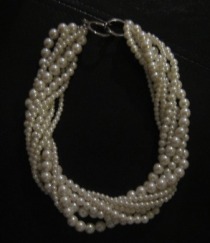
After...
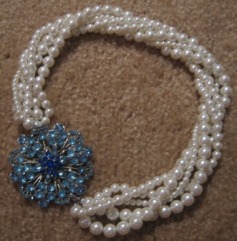
I removed several strands from the necklace so that it wouldn’t be too bulky and then I reattached different clasps. The necklace is meant to be worn with the brooch on the left side of my neck. I’m so excited with the outcome and can’t wait to rock it!
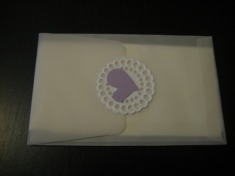
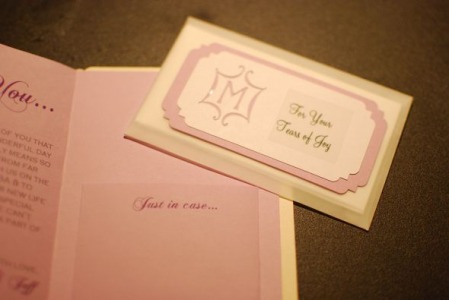
For Your Tears of Joy...
A couple of weeks ago when I went shopping (non-wedding related) at a closeout store, I came across these Martha Stewart vellum confetti packets. My creative mind started working, coming up with ideas, so I decided what the heck, for $6 I can make something really cute and add to our wedding details.
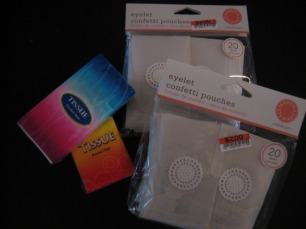
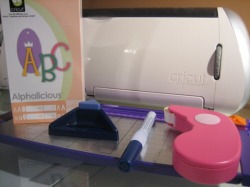
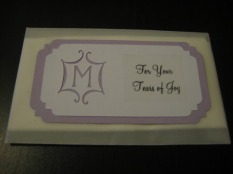
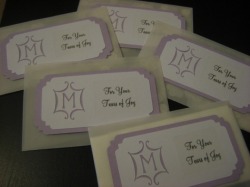
For this project I used my Cricut (the fiance kindly surprised me with one!) and the Alphalicious cartridge (crest card feature). I used the scrap paper from the Save-the-Dates for the mounting and plain white cardstock I already had in my stack of scrapbook materials. The corners and heart punch were provided by my Creative Memories consultant (thanks Leslie)! I created the saying "For Your Tears of Joy" on Word and printed them on Avery clear address labels (2 per label). Another money saving tip: Use what you already have in your possession! In my case, the address labels were previously used for sending out our Save-the-Dates.
After the gluing and taping I removed the confetti (hopefully I can use it for a different project) and stuffed each vellum envelop with tissue and VIOLA!
After the gluing and taping I removed the confetti (hopefully I can use it for a different project) and stuffed each vellum envelop with tissue and VIOLA!
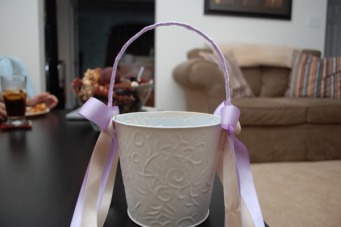
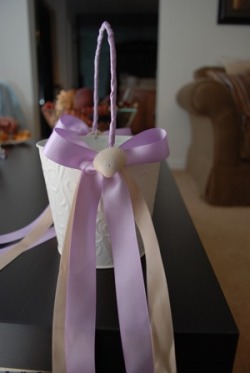
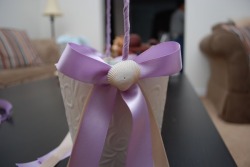
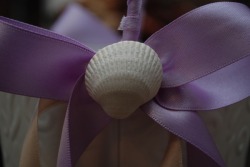
Flower Girl "Basket"
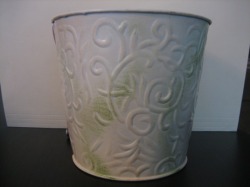
I came across this planter walking through The Dollar Store. I knew I wanted to do Flower Girl pails in place of baskets to incorporate our beach theme. I was initially going to purchase the pails online, but luckily I hadn't already. So when I came across these, my brain was in DIY wedding mode.
I started by drilling holes on each side, then I took apart a wire hanger to make a handle. We borrowed spray paint from the BFF and the fiance helped spray paint them for me. How sweet, I love that he participates!
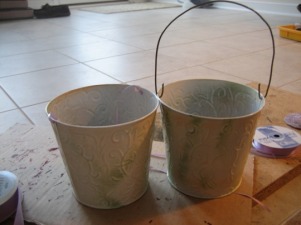
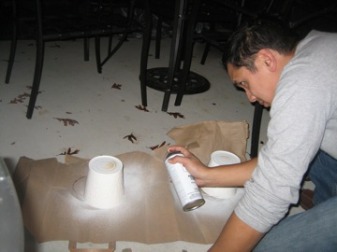
After the spray paint dried I started wrapping the handle and tying the ribbon. I already had the ribbons so I didn't have to purchase anything else for this project.
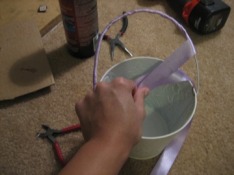
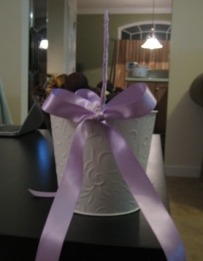
The shells used were picked from an OBX vacay (same shells that I used for the bouts). So all in all I spent $2 for our Flower Girl "baskets"...wow I'm cheap, but yet creative if I do say so myself!
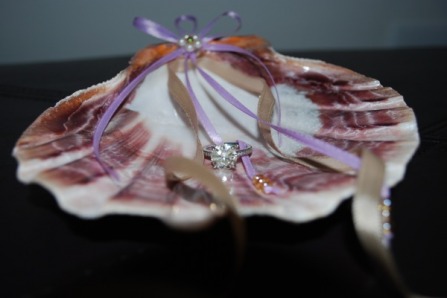
Ring Bearer Shell
So I opted to use a shell for our ring bearer instead of a traditional pillow. With all the things we are bringing for our destination wedding, the pillow will be one less bulky item in our luggage. Besides I think that our 2 1/2 year old bearer would think it was cool, wouldn't you?! Months ago I found inspirational photos online and again added another DIY project to the long list! What do you think?!
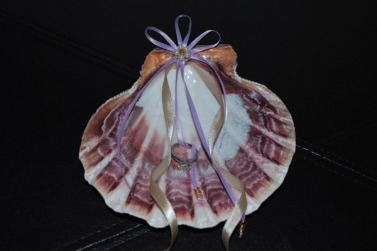
The details: I hot glued the ribbon in place, along with the individual pearls and gold center bead. I then strung beads on each lavender ribbon as an anchor for the rings. I also used the beige ribbon as another accent for the shell.
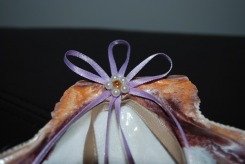
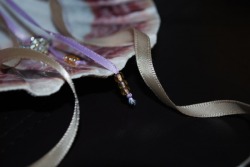
Another excuse to show off my engagement ring...
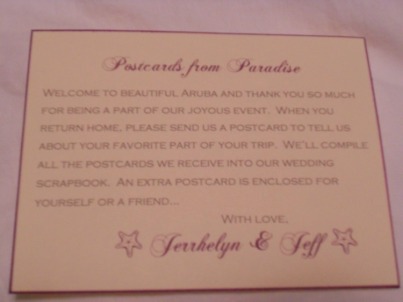
OOT postcards
Finding a great idea and a great deal equals new project!! The idea- postcards to add to our OOT (bridal vocab for Out Of Town) bags in lieu of a traditional "sign here" guestbook. The deal- 100 free postcards from Vistaprint! With a few clicks of the mouse I was done in minutes, of course with the approval of my darling fiance! He uploaded the picture (our FAV picture he took while we were in Aruba) and I wrote the text. Click here, click there, ordered, and now being printed and shipped!!
Front...
Back...

Faux calligraphy=fauxligraphy
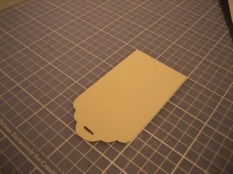
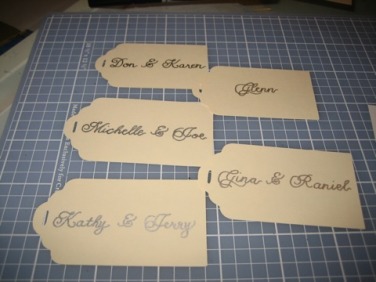
Jeff and I are tackling a huge invitation project, so to start, I wanted to make personalized tags using calligraphy. Being snowed in gave me time to start and finish this project. I was inspired by this blog to do it. Calligraphy can be expensive, so this was a better alternative. I first started by choosing a font (Chopin Script) from dafont.com then made a copy of our guest list. I made the tags using my Cricut (for those Cricut owners-it's the Tags, Bags, Boxes & More Cartridge. Its the scallop tag in size 3).
I then shaded the back of the sheet with a pencil, over the name so that when I turned it over and traced over the font with a ballpoint pen it left a pencil impression.
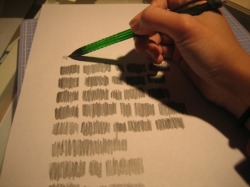
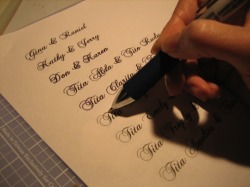

See how it's really light, but enough that you can see it and trace over it again with either a calligraphy pen or metallic pen, like one I've chosen below, the pen is a prismacolor metallic fine pen (found in the art section at your local craft store).
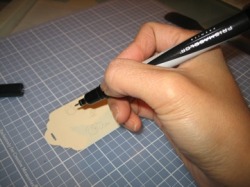
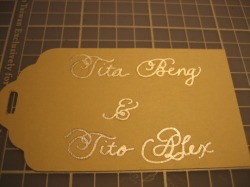
So after you let it sit and dry (maybe 5 minutes) use an eraser to take out any excess pencil marks.
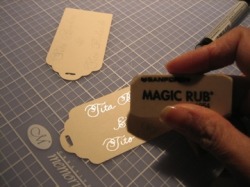
I'll tell you, this project takes patience! I did redo some just because I'm picky like that. But I'm really happen with the way it turned out. It'll give our invites a more personal touch! So what cha think!?
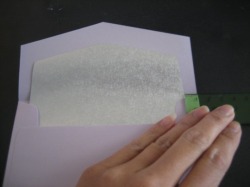
Envelope liners:
I wanted to give our wedding invitations a little more pizzazz without breaking the bank so I found this really neat trick for our envelopes. I lined the envelopes with GIFT WRAPPING PAPER!! I purchased heavy duty wedding wrapping paper from Hallmark which only cost me $4 and I still have enough to wrap presents for the MANY upcoming weddings we'll be attending!
First I just made a template using regular paper (so I wouldn't waste the good stuff). Keep in mind you don't have to make the template the FULL size of the envelope because no one will look all the way down the envelope (lets hope)! Then I just traced the template on the backside of the wrapping paper. If you notice, Hallmark's wrapping paper has square templates so you don't have to worry about cutting a straight line (this made it so much easier)!
First I just made a template using regular paper (so I wouldn't waste the good stuff). Keep in mind you don't have to make the template the FULL size of the envelope because no one will look all the way down the envelope (lets hope)! Then I just traced the template on the backside of the wrapping paper. If you notice, Hallmark's wrapping paper has square templates so you don't have to worry about cutting a straight line (this made it so much easier)!
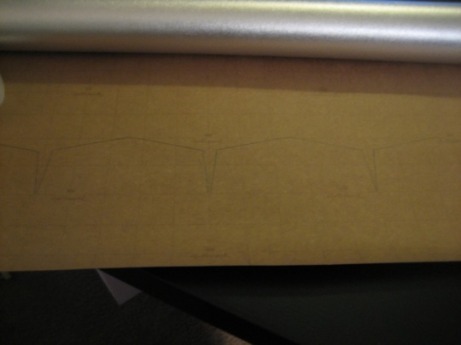
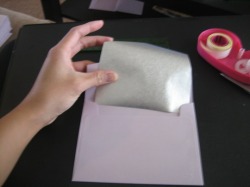
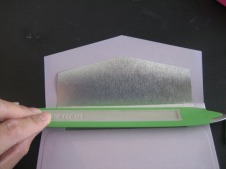
After drawing the templates, just cut the liner and slide it in the envelope.
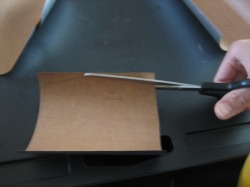
Before I taped the liner down, I measured each side so that it was even.
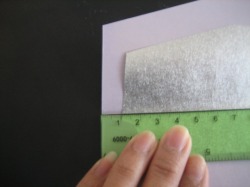
Once it's even on both sides, use a bone folder to make a crease in the liner. Once that's done, fold the top part of the liner down and add double sided tape or you can use glue.

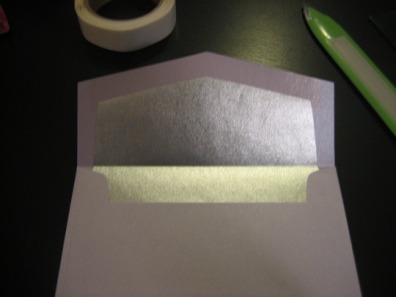
And now you done!! I had 85 to do and it took me one evening, but I'm sure if you have a bigger invite list this can be tedious, but I had the time and a smaller budget! So if you start now, it can be done!
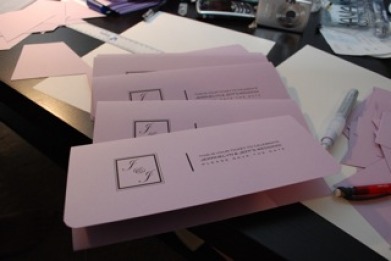
Little gifts in the mail (our box invitations):
We decided that we wanted to do box invitations for our Aruba Wedding since it would be unique and more special for our guests. I purchased:
-boxes (5x7 kraft boxes) from Papermart.com
-starfish (3-4 in.) from Ebay
-raffia from Michael's Arts and Crafts
-ribbon (3/8 in. in Orchid) from Papermart
-mailing paper from The Dollar Store
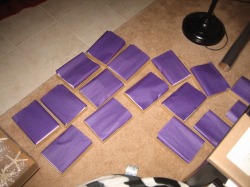
-tissue paper in eggplant from a local paper store
-tags made by my Cricut with hand written Fauxllilgraphy
-invites were printed from a local invitation store using Envelopments papers
-Hallmark heavy duty wedding wrapping paper for envelope liners
-address labels from Labelsbythesheet.com
-boxes (5x7 kraft boxes) from Papermart.com
-starfish (3-4 in.) from Ebay
-raffia from Michael's Arts and Crafts
-ribbon (3/8 in. in Orchid) from Papermart
-mailing paper from The Dollar Store
-tissue paper in eggplant from a local paper store
-tags made by my Cricut with hand written Fauxllilgraphy
-invites were printed from a local invitation store using Envelopments papers
-Hallmark heavy duty wedding wrapping paper for envelope liners
-address labels from Labelsbythesheet.com
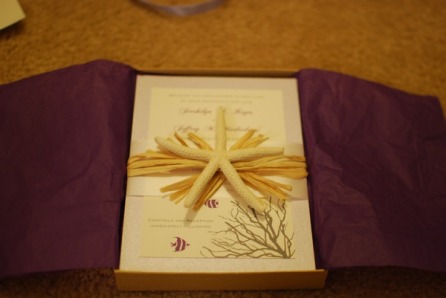
We used a belly band to wrap all the materials (rsvp card/return envelope) and then wrapped that with raffia, hotgluing the raffia to the bellyband and hotgluing the starfish to the raffia.
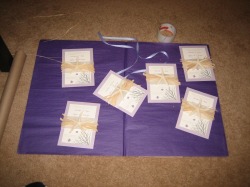
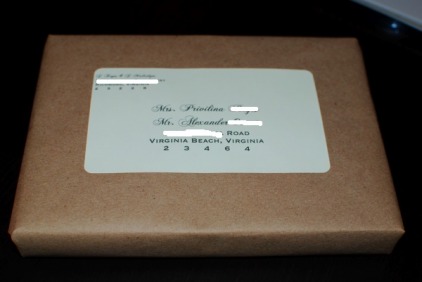
All these invitations got sent 2 weeks ago and arrived to our guests fine! No damages to the boxes or starfish! We did pay $1.73 for each invitation box (first class mail). It was worth it because all our guest loved them and we're still getting compliments. The invitations are also making our guests more excited for the festivities to come!! Can't wait!!
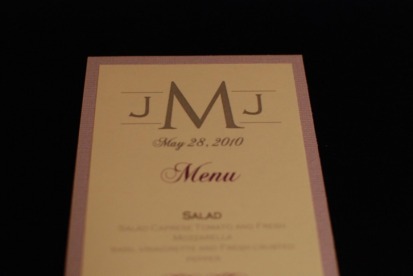
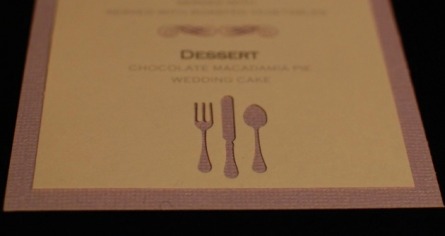
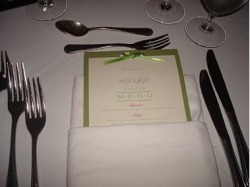
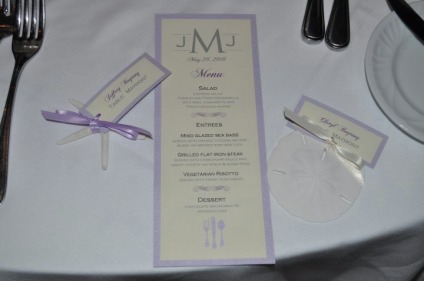
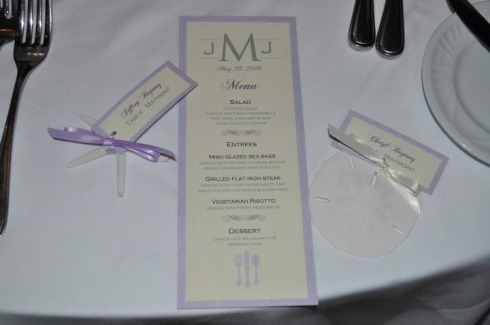
Dinner menu, yummy:
The inspiration for these menus are from Mrs. Penguin on Wedding Bee. I purchased the silverware punch from Impress Rubber Stamps and I created our monogram using MAC Paintbrush. I then downloaded Nymphette from Dafont.com for accents. Printed 3 menus on an 8x11 sheet of ivory cardstock (using landscape mode) and mounted the menu on lavender cardstock.
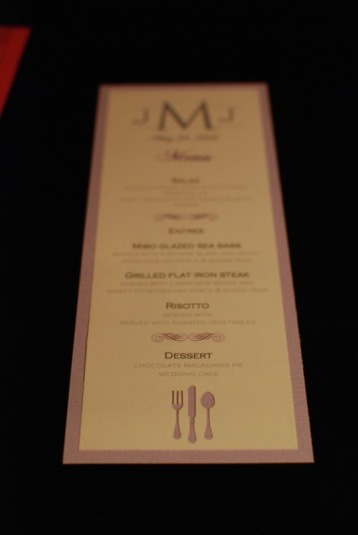
Here's a closer look at the monogram (the fiance wanted a clean simple look, so no fancy swirls)...
The silverware punch close up...
FYI: I added this project last minute with no intentions of making any until another Westin Aruba bride showed me her lovely menus (picture below) from her wedding. Thanks Linda!
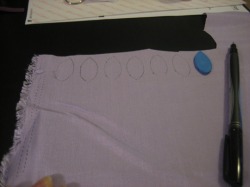
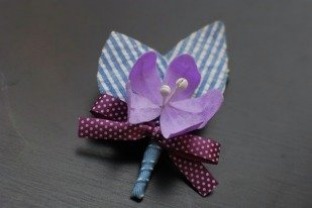
Fabric flower boutonniere (take 2):
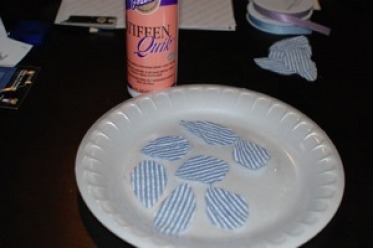
The fiance got inspired to make fabric flowers for his boutonniere and for go the previous shell bouts we made months ago. To start this projedt here's a list of the materials and cost break down:
-Fabric (colors of your choice): Lavender-$1.06 1/4 of a yd
Seersucker-$1.06 1/4 of a yd
-Fabric stiffner: $3.50
-Tacky glue: $1. 50
-White floral wire: $1.99
-Ribbon: $1 per spool (we used 2 different colors-1 for stem and the other for bow)
-White polymer clay: $1.29
-scissors, styrofoam plate, pencil/eraser
First you need to make a template for the petals and leaves to the size of your liking. We used foam (because we already had it and its sturdy enough to reuse again and again), but you can use a thick cardstock. Once that is made, trace the pattern onto the fabric. You'll need 4 leaf petals and 10 flower petals to make 1 boutonniere.
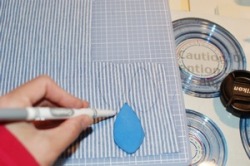
Cut the patterns you drew then place on a styrofoam plate and spray with fabric stiffner (we sprayed on 3 coats for a stiffer feel). Let dry or you can put it in the microwave for quicker drying time.
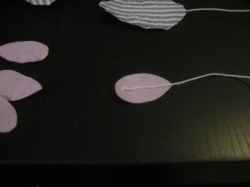
Cut 9 pieces of white floral wire about 4 inches long. Then take the wire and smear tacky glue on wire and place in the center, close to the top of a single petal. Continue to smear tacky glue on petal (I did this with my finger for evenness. FYI- don't dot the glue, because it'll leave visible dot marks through fabric). Then place another petal on top and press down to stay together. Set aside to let dry and continue this process for all petals and leaves.
While waiting for all the petals and leaves to set and dry, make the anthers (white looking buds in center of flower) using polymer clay. Break up little round pieces of clay into a tiny ball and wrap around white flower wire. Then make an indent in the center of the ball with your finger nail or sharp edge, like scissors. Follow the directions on clay wrapper for hardening instructions.
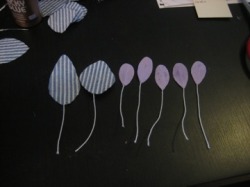
Once all materials are set, dried, and hardened, twist floral wire together or wrap a single floral wire around entire stem. After tightly wrapping all stems together, arrange the petals how you'd like. Wrap the stems in ribbon using tacky glue or a hot glue gun.

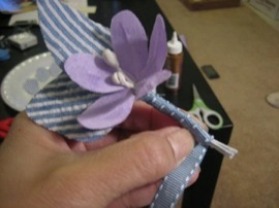
Finally, accent the bout. in another ribbon color by tying a bow underneath the flower petals!
Personalized Water bottles...
I created these personalized water bottle labels using a template from Ruffledblog.com. They were a huge hit for my bachelorette goodie bags! I purchased 8.5x11 waterproof sheets from labelsbythesheet.com (FYI: 4 labels are made per sheet). After fixing the template to my liking I got them printed at my local Kinkos so it wouldn't use up all my ink! After printing is done, just cut and replace the old water bottle label with the new! Viola...easy peasy, another easy detailed project that your guests will drool over with no time and less money spent! This same template will also be used for our OOT bags for the wedding, except of course with the fiance's and my name all over it...so stay tuned for those!
If you want to know, I used Dasani water bottles and it fit them perfectly! I tried using the Costco bottles and they didn't work out so well! So if your very particular (like me) try it out first on one bottle and purchase the rest after you find the one that works best for you, cause once it sticks there's no turning back!
If you want to know, I used Dasani water bottles and it fit them perfectly! I tried using the Costco bottles and they didn't work out so well! So if your very particular (like me) try it out first on one bottle and purchase the rest after you find the one that works best for you, cause once it sticks there's no turning back!
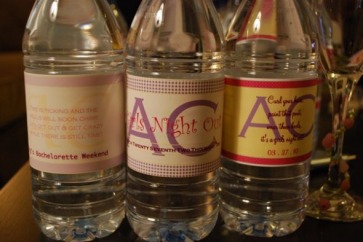
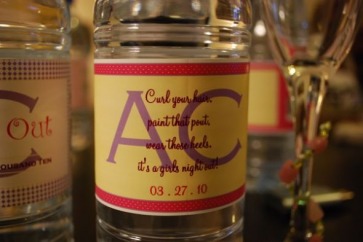
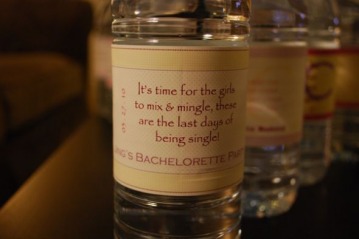
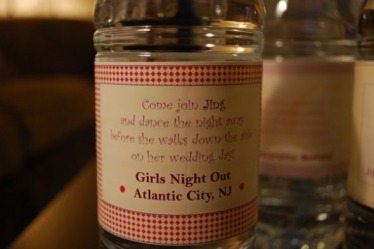
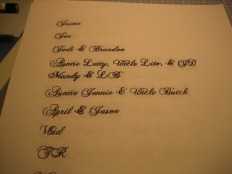
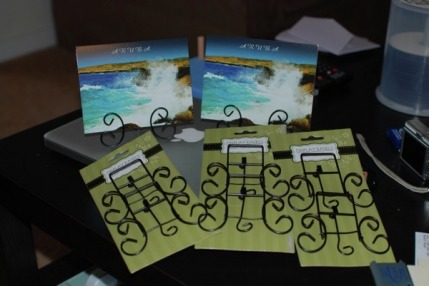
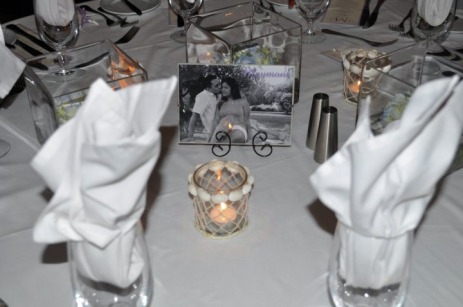
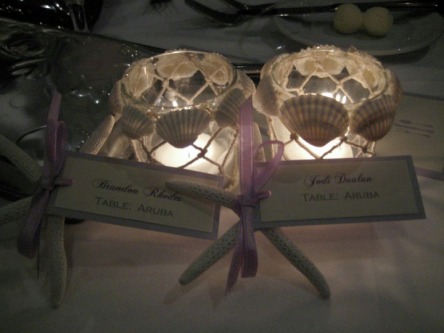
Table Names...
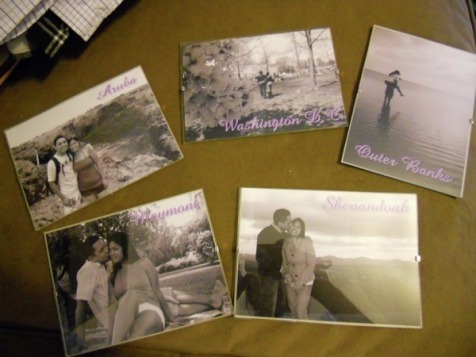
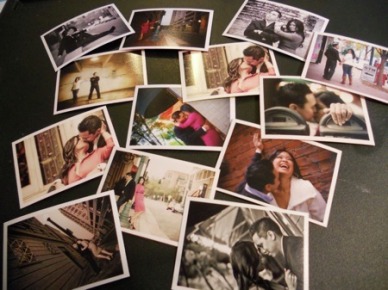
Jeff & I are all about pictures and vacationing, so for our table "numbers," we decided to do table "names" instead. We gathered some of our favorite pictures of us in our favorite places, printed them in black & white with the names in lavender. This was done at Ritz Camera, you can choose the size, font, & color you want for the names. I then mounted them in a glass frame from Ikea to protect the picture.
The easels were purchased from The Dollar Store! Crazy huh?! 2 easels for $1, nothing beats a steal!
Escort cards...
We used starfish and sand dollars for our escort cards. To help the waitstaff differentiate guests meals, I chose to use starfish/lavender ribbon for the beef entree and sand dollar/ivory ribbon for the fish entree. The shells were ordered from Quality Shells and I used the Avery address template for the guest/table names. The guests and waitstaff thought that it was a clever idea...I did too!
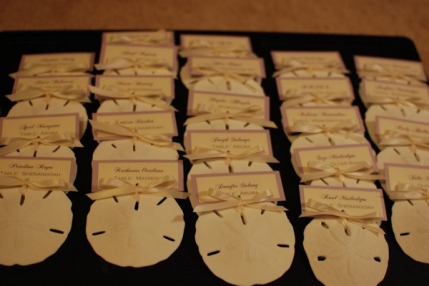

photos below courtesy of our wedding guests:
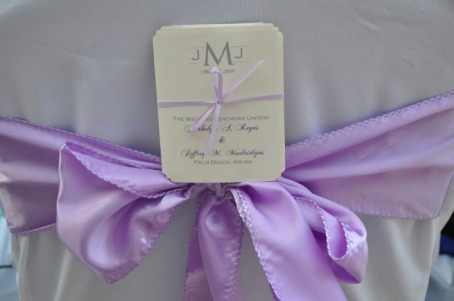
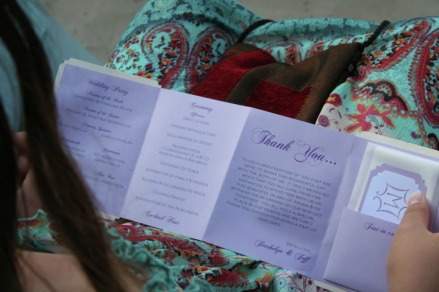
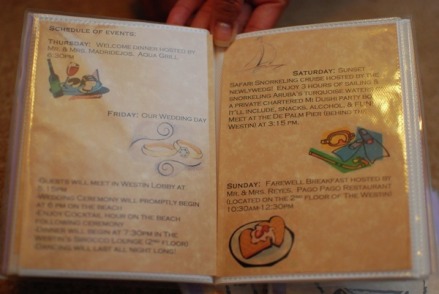
Ceremony programs...accordion style
So I got the inspiration to use Mrs. Cupcake's wedding program and this is how I'm turned out! The frustration though came from looking for the lavender 8.5x14 paper, but I did and I was able to fit 2 programs on one sheet in landscape mode. I folded the program in 4 (3.25 in. each side) and then use double sided tape to mount.
For the cover I fit 4 covers on an 8.5x11 sheet of ivory cardstock and cut it in 3.75x 4.75 in. Cut the same size of blank ivory cardstock for the back sheet. Then I finished by using a corner punch.
For the cover I fit 4 covers on an 8.5x11 sheet of ivory cardstock and cut it in 3.75x 4.75 in. Cut the same size of blank ivory cardstock for the back sheet. Then I finished by using a corner punch.
For the tissue packet pouch I printed "Just in case..." (9x spaced out for cutting) on another blank 8.5x14 lavender paper and made a pouch to fit the tissue packet for the program. I attached the pouch using double sided tape.
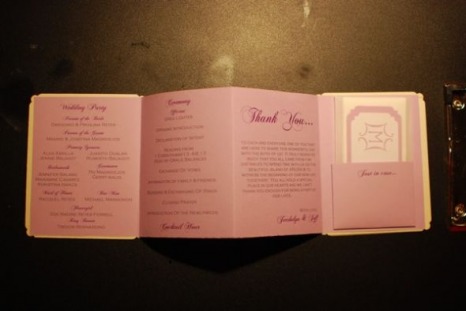
The tissue packet tutorial is above if you need it!
If you like the programs... you can upload the file here: Good luck and if you need help, just ask!!
| programcover.doc |
| programtemplate.doc |
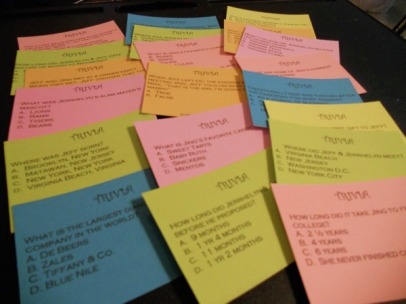
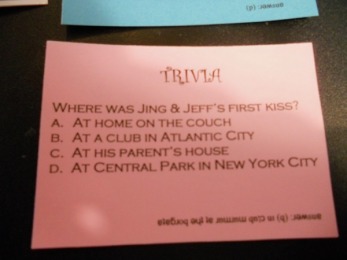
Wedding trivia cards...
Remember when I blogged about wanting to do this, well I pulled it off! I printed wallets of our engagement pics from Costco (only $0.39 for 4 wallets), I only paid $10 for 100! I purchased 8x11 sheets of bright labels from Labelsbythesheet (they were on clearance, $0.28 per sheet) printed questions on them and cut and mounted the the label on the back of the wallet!
We'll be putting these on tables during our Welcome Dinner, kinda an ice breaker for our guests. I figured this could kill time and get our guests to talking as well as getting to know Jeff & I better as a couple! Oh yeah, and the guests can walk away with another keepsake!
We'll be putting these on tables during our Welcome Dinner, kinda an ice breaker for our guests. I figured this could kill time and get our guests to talking as well as getting to know Jeff & I better as a couple! Oh yeah, and the guests can walk away with another keepsake!
I came up with about 60 questions about Jeff & I and 40 wedding trivia questions, no one question was duplicated. I found some wedding trivia questions from this site, which were funny and interesting. After coming up with all the questions, I used this template to type the questions, printed, and cut to fit the wallet pictures accordingly.
And if your wondering how people would know the answer, I found this site to get text upside down, typed and copied & pasted onto the template.
Bon Voyage Brochure...
Two weeks before our big trip, I sent out these brochures to get all our guests excited about their upcoming trip to Aruba! The brochure consisted of a thank you note, packing list, house checklist, transportation info from the airport, & weekend itinerary. Because I have a vast selection of scrapbook supplies (one of my hobbies), I wanted to put a little of scrappin' creativity into this project.
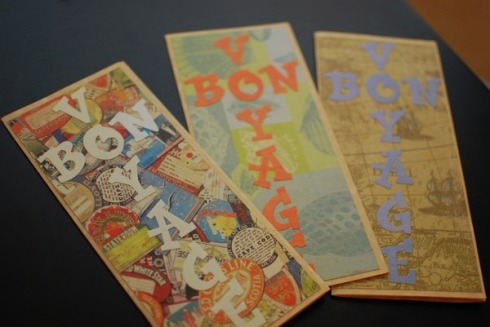
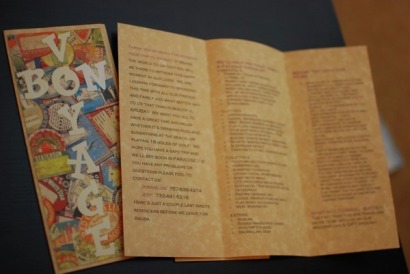
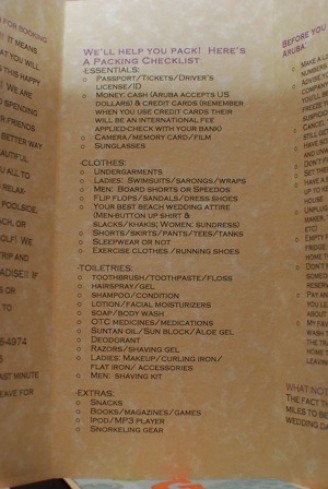
You can read more about this project on a previous blog post here. This project, another huge hit! You can info your guests of your upcoming event and all your guests will definitely be more excited about the trip to Aruba!
Welcome book...
I got this idea from bestdestinationwedding. I included this welcome book in every guests' bag, which included info about Aruba (weather, maps, Pampiamento/English translation), photoshare link, thank you note, phone list, and weekend itinerary (see pages below). I got the 4x6 albums from The Dollar Store and linen paper from Staples. I was able to get 4 'welcome book' pages in 1 8x11 sheet.
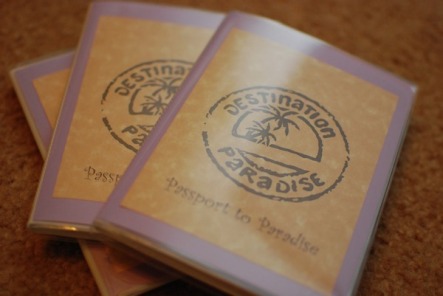
Information was obtained from Aruba.com, Frommer.com, & visitaruba.com
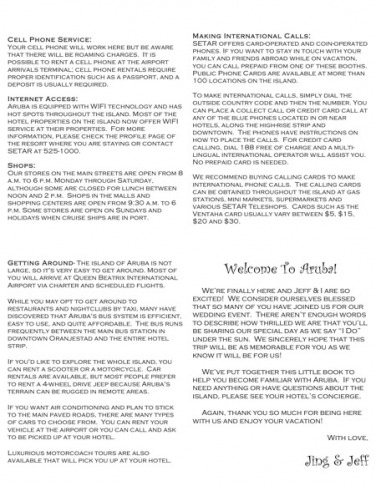
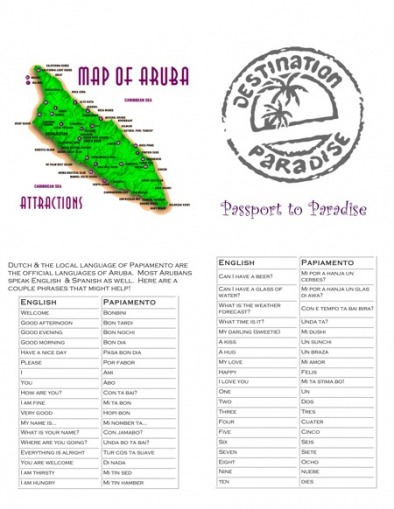
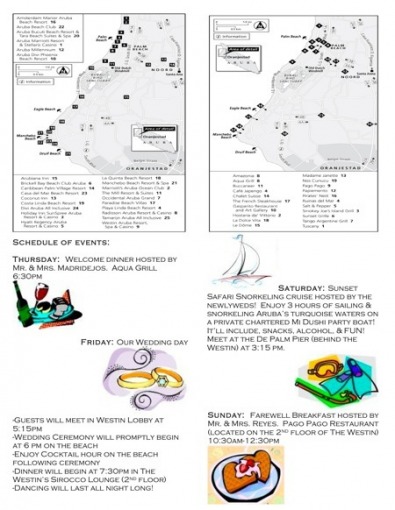
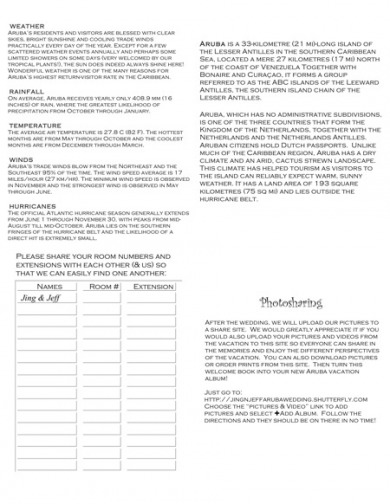
Check out the inside pages of the finished product! I love the way they turned out! A little time consuming, but worth it 'cause all the guests loved 'em!
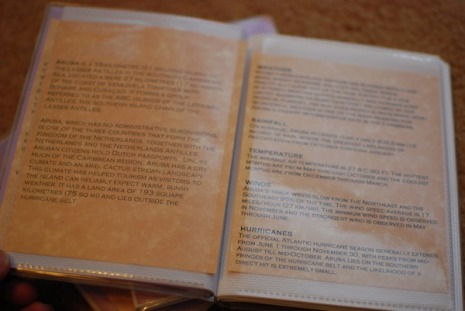
After the trip the guests can take out the pages and use the book as their Aruba Vacation Album! So it serves 2 purposes, creative huh?!
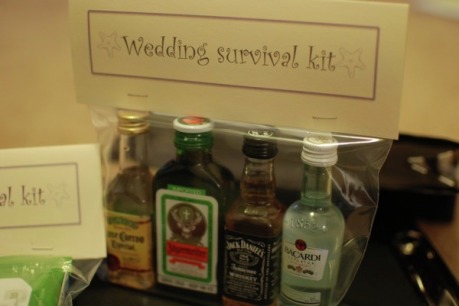
Wedding Survival Kits...
I thought it would be a cute idea to gift our wedding party with last minute things they might need for the wedding day. I originally wanted to make a kit just for the girls, but I felt bad not giving something for the gents, so I came up with a mini liquor kit!
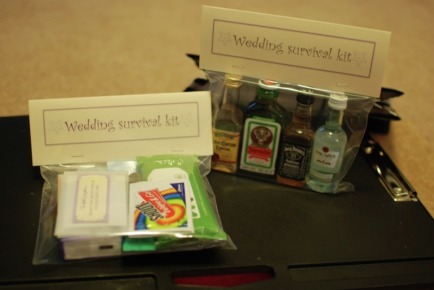
The girls kits consisted of: antibacterial wipes, Shout (stain remover) wipes, tissues, makeup remover, Bath & Body lip gloss, DIY blotting sheets & pins.
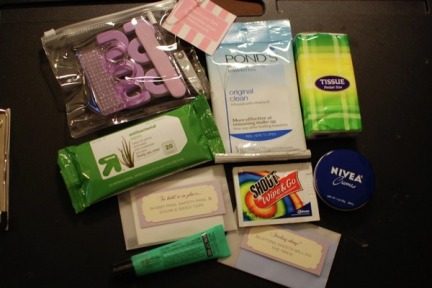
Remember those vellum envelopes that I used for the tissue packets? Well I had extra and used them to make "To hold it in place..." kits which had bobby pins, safety pins, & double sided tape. All things I already had in my possession so it wasn't another expense!
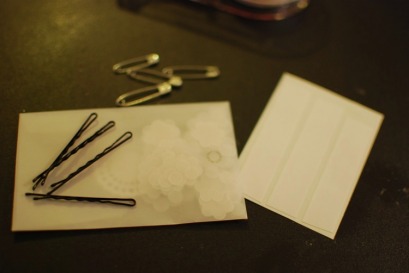
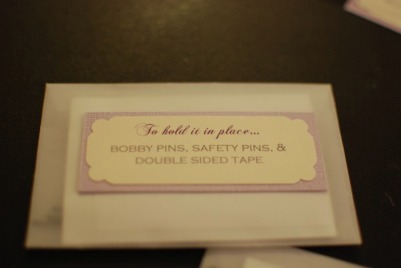
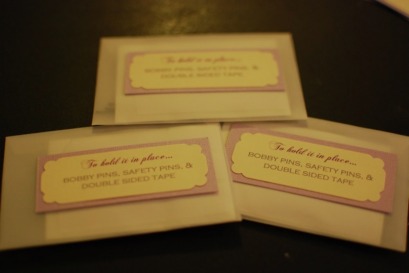
The actual packaging was just a ziploc bag and the label was made in Powerpoint, then printed on cardstock, folded, & stapled! So easy!
Here's the template for the survival kits if you'd like to attempt this simple DIY project! Keep in mind when you download this, the starfish picture (dingbat) was downloaded free from dafont.com, it's called wmaquatic1. So if if doesn't show up when you upload the file, its because you need to add the font/dingbat into your font book or you can find one that fits your theme, upload, and change to suit your liking! Have fun!
| survivalkits.pptx |
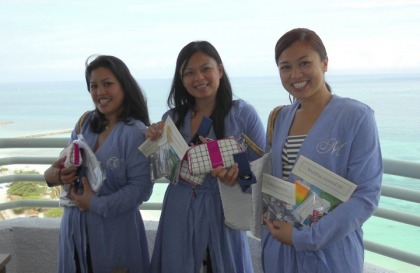
Personalized Robes
I bought these simple robes from Target, on sale for $15 and got the rhinestone initials from an Etsy seller. All I had to do to personalize the robes for my girls was to iron on the rhinestone!
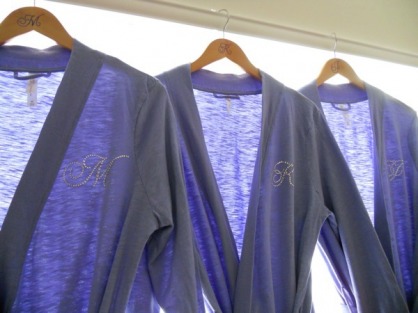
The hanger was made using the fauxligraphy process I used for our boxed invitations (above).